How-To Videos

Just Kampers - Part Of The VW Community Since 1989

JK have produced a number of straightforward video guides to help keep fellow VW enthusiasts on the road. From simple jobs like Changing Wiper Blades or Replacing the Fan Belt through to Brake Replacement and all the way on to Fitting an Engine the videos cater for all skill levels.

If you're planning some work and would like a specific video guide to help please get in touch with JK.

  • Fitting a Diesel Heater

    Fitting a Diesel Heater

    How to fit a Diesel heater to a campervan & a van conversion. (00:00) Welcome back to the Benanna wagon, our Sprinter project. As you can see, we've got it in our lovely grain store today because, one, I need to jack it up on a nice flat surface which we have in here and also it's a little bit drizzly out there. So today we're going to be fitting our Eberspacher heater, the diesel heater. I don't know if I've pronounced it right, but Nick will spell it out for me because I'm not 100% sure, but the diesel heater. So we're going to take a look at that. First things first, I need to jack this up so I can get underneath and have (00:29) a good coat of looking at it so I'm going to put my overalls on first because I don't want to get completely filthy let's get cracking this is the diesel heater kit look at it there's loads of it it's pretty awesome I have to say so I've unboxed it to have a good look at it and familiarize myself with what we've got I've never fitted one of these before so I think it's going to be really interesting so what I've worked out from this so far we've got a heater we've got ducts in we've got wiring loom we've got an exhaust (01:29) and we've got our Outlets as well so these are our hot air outlets but before we touch any of this I need to drop the fuel tank on the van first thing we need to do is open up our fuel flap and we need to remove this because I need to remove the filler fuel neck part of it to be able to drop the tank so first part with the Torx 30 on a ratchet which I have just here to start on doing you see our further neck is loosened away from the body so that should come down with our tank all in one go so we're Underside ready to drop the fuel (02:08) tank down Nick's actually filming upside down at the moment but I think he can probably spin it around with his magic stuff on the computer I need to disconnect fuel pipes so we've got two fuel pipes here ones and in and one's a return and also a wiring plug there these wiring goes to our sender unit in the tank and then obviously last of all I just need to undo the straps and drop the tank down now I've got the tank supported with the trolley jack and a bit handy wood from the workshop so all we need to do is undo stuff (02:37) just as a matter of Interest, the bolts that hold the fuel tank straps up they're an external Torx type, and they're an external Torx number 14. I've just grabbed an oil drain tray because I've got to undo a couple of fuel pipes and it will get messy so this should catch it all I've got my safety glasses on to stop dirt and Diesel dropping my eye because it's not a good combination I don't think first thing I'm going to do is unplug our electrics so I slide my little crafty screwdriver in there like so I (03:15) should release the clip to be able to undo it like that lovely next I need to undo these clips on the pipes now these can be a little bit more fiddly so I need to squeeze them and push them and pop them up and that will take the locking mechanism off and I should be able to just slide them off as well very last thing to remove before I actually do drop the tank is this gasket that goes around the filler neck underneath here so I've managed to tease that out of past the filler neck and now I can drop the tank so I can take it really slow with the (03:48) trolley jack, hopefully we're not too caught up with the tank but ideally I don't want to spill any diesel so we're just going to lower it as slowly as I can really in the middle oh so it's a little earth tag to unplug so I've unplugged it, didn't want to pull him out, so our tank's down on the deck now all I need to do is just pop that filler neck this side and then we can slide the tank out so I really don't want to drop any dirt in that tank at all last thing I want to do is start picking up dirt that's going to go into the filter could possibly go (04:29) through the filter and then damage the fuel pump but the main thing is we need to clean the top the best we can before we take that out I'm going to disconnect the pipes from our sender unit they have the same type of Clips as before so again we're going to push those down and try and tease them out with a screwdriver I have this clip so several ways you can remove this sender unit you can either use a block of wood and a hammer and gently tap it round or you can get a proper tool that fits over and with its feet and grabs (05:03) the edges and you can undo it that way or you can use one of these this was proper type so I've had to resort to this special pliers oh yeah so I should probably say why I'm removing this the reason I'm removing this is because we need to get a fuel feed to our heater so I'm going to use this little spare pipe here this Outlet is actually blanked off at the moment we're going to drill through this Outlet so I've removed our sender unit and obviously you can see this this is what's called a swirl pot and it's always got fuel in it so you never run (05:37) out of fuel when you go around corners that's the idea but it's no good to us because we need to be able to drain that and not make a mess so again we need to be super careful next I can drill through this little blanked off fella here and that will supply our fuel supplies for our heater so so with the drill I'm going to gently drill through I'm gonna put my finger underneath as well so I don't want any of that stuff falling through so you feel a bit of a resistance and then it pops through obviously don't go too far because you (06:08) end up coming through the back and that'll just ruin the sender unit so that's that bit done so this kit comes with a quite a small fuel pickup pipe so if you didn't have that basically the little blacktop version we've got there you could drill right the way through and fit this but this is really small and it doesn't fit our fitting so I'm not going to use that I'm just going to use a standard bit of six mil fuel pipe that we sell I've cut it to 20 centimeters in length the reason I've done that is so when this is in situ in the tank (06:41) we can't basically drain the whole tank dry with just leaving the heater running overnight so you don't get up in the morning and find that you've got no diesel left to get to the diesel station the way I've done that is obviously I've measured the complete depth of this tank right the way down to the bottom and then minus probably about 40 or 50mm I think so we're well in so we should keep somewhere roughly around between an eighth and a quarter of a tank before we run out and this will cut out at that point (07:09) so that's just a little safety tip so we can push this on up underneath and I can fit a nice little clamp under there this is our fuel pipe that comes in the kit as you can see it's a lovely little tiny tiny weeny weeny blue fuel pipe but this is really resilient and perfect for the application it's got a lovely little 90 degree bend almost a bit of pipe here which is the same size as this but as you can see that wouldn't have fitted our outlet from our pickup so I've got a tiny little length of eight mil fuel pipe which will now fit nicely (07:45) and snugly over this end and I've managed to squeeze this into this end too now the two rubber parts that are going together so a little trick there is just spray a little bit of window cleaner that actually slips in there really quickly and then once the window cleaner dries is secure so I've put a little clamp around it just to be doubly safe sure but this can go on now and that should just slide on give it a little wiggle right ready to refit definitely do not want to uh forget this this is our main seal that goes between I'll send the (08:18) unit in our tank obviously tank's lovely and clean I'm just gonna pop the seal on he's nice and clean too right lovely and now we can submerge our fuel sender, this is for the fuel gauge so we've got to be careful getting him in first there's a wiggle there we go actually before I go any further I've made a little bit of a boo-boo this pipe here I wanted facing towards the front of the vehicle which is that way and for some reason when I had it out I thought I had it the right way around anyway I didn't so I'm just going to quickly (08:57) loosen this clamp and switch that over so Sean's come down to check us out he's our um QC, so now I've got the pipe facing the right way so he's facing forwards I can put our seal ring back on we need to be careful when we compress this that we don't ping the spring out let's pop that round and our seal's still in place I'm getting this sort of located like that right just push down and we can start boom there we go so that's super tight now obviously we use the magic pliers to do so I've managed to get that Arrow all the (09:40) way around nearly just in line with the original arrow but it's so tight I don't want to go any further because these rings are only plastic and we know that that seal is in good shape and that'll be compressed lovely lovely clipped on beautiful okay can I have a bit of wood please Nick thank you very much so we've just pushed the tank strap in this side and it's lined up with the holes really easily so I'm going to put the bolts in to secure the back end Nick's very kindly helped me jack the tank up as you can see so we've got the (10:15) jack sandwiched between the jack we've got the tank sandwich between the jack and the floor all I need to do now is put the tank straps on put the bolts in and that's the tank bolted back in and then we just need to obviously put the screws back in for the filler neck and the filler flap cool squeak his jack in history pretty squeaky I think we need a can of spray on it or something some lube I'm just going to try and line up the original marks that the bolts left we call them witness marks so hopefully the door is in exactly the (10:51) same position the little filler door than it was before I'm just going to pop down and put our fuel pipes back in and our sender unit but you can wait here I'll be back in a minute fuel tanks all back up and bolted in position really proves that and we've got our fuel feed coming out for our heater unit next we need to put our heater unit into the van I've decided to put the heater unit under the passenger seat and this side of the passenger you see as it's in a Double C purely because I think it's probably the (11:24) best and safest place for it underneath's okay but inside we're away from the elements aren't we and I think pushing the heat from this corner is probably the best for the for the van as well so we're going to start in this area and the Heat's going to disperse that way they've also got a fan vent in the roof so they could draw the air through if they needed to I think that I'm going to drill the holes next and actually get the main unit bolted in position and then we can look at maybe putting the feed pipes in (11:52) after that my template marked out under the seat I'm going to run through with a pilot drill first through all the holes and then after that for the big holes for the main part of the heater goes through I'm going to use a cone cutter like so to cut the big holes so let's get that done the holes are drilled so I'll let Nick do the honors it's nice and snug okay that was a nice test fit thanks Nick but before we put it in permanently I'm just going to put a little drop of paint around the bare edges so we're going to continue (12:29) drilling because we've got a couple more holes to drill and that's for these this is the outlet the hot air outlet and we've got another one for the air Inlet as well I'll show you where they go we decided to put our hot air outlet here this can twiddle around as well so it can face up or face down it's quite a nice position in the van and we can push the heat from here to the back our Inlet we decided to go here in the side of the seat base so we can draw air in through this side heat it up and push it out outside so we'll be (12:59) recirculating and heating our air so we it should make it quite efficient and uh heat it up very quickly thank you this is our heater with its pipes on obviously they don't need to be this long this is as long as they Supply them so I'm going to pop it in and sort of roughly work out where I need to cut them to length really so that is our next job with spare you can actually make it into a or not just okay that's pretty cool I'm pleased with that that works well so we've got our Inlet here snakes around nicely through our hot air (13:58) device and then snakes round straight into the back of the van I'm quite impressed with the whole unit itself and how it fits but mainly those flexible pipes they're really good they don't kink they actually follow the nice shape really easily so we're gonna have good flow through that the next bit is quite fiddly it's nuts and washes time to go on uh and fix it from underneath so I'll pop under and do that and show you when I'm done we've got the two pipes popping through here and our little pipe here and obviously our nuts (14:27) onto our studs to secure the actual unit itself now this little Tinky pipe here is our fuel feed in so we'll have a fuel pump that will drip feed fuel into here this is an air intake and exhaust the air intake and the exhaust is for the burner only which is inside the actual unit itself so this would be our fresh air intake pipe for instance I'm just going to gently push that on there so I'd need to put this somewhere where it's not going to draw water so I wouldn't put it right behind the wheel Arch down here where the mud flap would (14:58) be so try and get it up as high as possible that draw fresh air in we drip free feed a little bit of diesel inside the burner burns and the exhaust comes out of here and then inside our fresh air is drawn in over our heat exchanger and then the hot air is in or warm air pushed out into the van so we don't get any contamination of exhaust fumes inside next I need to finalize the positions of the air intake pipe and then fix it with a little clip so we've got a pipe clip that'll go around here and then a little p-clip that will go (15:29) around this pipe too and the same with the exhaust and then I've got a muffler on the exhaust so this Muffler here will obviously quite an exhaust sound down again I need to mount him somewhere so I'll find somewhere really nice to mount him air intake I am going to put further up here so I'm going to keep quite high and it doesn't look that dirty up here as in I don't think much of the muck from the road and the moisture is getting up literally up there I think that's a good place for our Inlet so that's what we're going to go (15:59) with our exhaust is going to come down I think try and get away from either underside maybe out of the vehicle not sure yet air intake definitely up there though I'm going to fix our intake pipe first it's quite long and I wanted to leave it quite long because I can get it right up out the way of our weather and water and all that jazz so I'm going to put a fixing in here I'm sure that obviously got my safety glasses on drill through there put a screw in there and do the same up there then that side of it's fixed and I'll move on to the (16:30) exhaust pipe I think so anyway let's uh get a hole drilled all right so fit in the first p-clip to our Inlet pipe oh my god I do have to say Mercedes know to make a van uh you need some mega hardcore drill bits to drill through that part of the chassis I've done it it's screwed in that's the first one fitted the exhaust is actually pushed onto our heater unit and I've put a clamp at the top there to hold it now I'm gonna run this along the Sill and then clip it along there and put our silencer on somewhere like that I think (17:12) yeah pretty good for our exhaust mount I'm going to use a Riv nut just because it's going to be a little bit more substantial than just a self tapping screw so I've drilled our relevant size hole for our M5 is what I'm going to use M5 size rivnut give that a good old squeeze and then we have an M5 thread perfect so I can bolt our exhaust to that now I can tighten up our 10 mil bolt there a couple of p-clips on the exhaust line jobs are good so the last two clamps for our exhaust pipe I'm going to put one either side of (17:46) this part here of the sill panel because what I want to do I want to keep this up out the way and uh you know we don't want to drag this over anything and cause any damage when we're driving so that's going to be quite tight up through there put a clip either side of that I think will do just absolutely perfect important notice from Eva spacker I think I said it right that time important note is this is the new fuel metering pump so it's telling me that the connections are actually on the other side to the old pumps so not to (18:18) get them confused which way they flow so again just check diagrams and instructions it's a must and it's telling me that I need to also have the fuel pump angled up between 15 and 35 degrees on the output side so that's good to know okay that's good I'm pleased with that comes with this lovely little um mounting rubber mounting so that squeezes in there and then we can screw that straight to our chassis look at that it's quite tight it's quite a good fit beautiful remove the passenger side step the reason being is that I could get to uh (18:55) where I needed to drill for our fuel pump mount so I sussed out from the other side exactly where I wanted to put the fuel pump I couldn't get my drill in there so I managed to mark it enter it from this side and obviously if you drill a hole make sure you pop a little bit of paint around it just for anti-corrosion so I've changed my mind slightly on the fuel pump I did have it fitted this side which was lovely and neat it kept all the pipe work really neat but I was just a bit concerned that it was a touch close to the exhaust even though it was (19:22) probably okay so to err on the side of caution I've moved the pump across to the other side so our pipes are well away from our exhaust now I'm much happier with it in that position it's away from our exhaust we've got our fuel Inlet coming into the bottom of the pump and then our input out the top into our heater unit so next let's get some wiring to it the wiring was actually really quite straightforward when we had it laid out on the table it looked quite daunting but really it just had a lot of length to it I think just for aid fitting too (20:03) if you're putting your heater underneath you've still got a lot of wiring to be able to run your control panel to where you need it now we plugged the main control unit in so that's all loomed and plugged ready to go then all we had were feed wires and Earth wires so we run straight across to our Leisure battery over the other side then a pair of wires down to the fuel pump obviously one for earth and one for the actual feed for it and then the other wires was simply the hand control panel simple as that which I ran up the (20:31) b-pillar and all the way into the back so they can control it from inside of the rear the really cool thing about this control panel is you can either set it timed or you can set it manually also you can run the heater unit as just a cold fan obviously the full-on heater as well so we're going to turn it on for one final test so for example you can see here our heater is on and we've got it to set to run for the next 29 minutes wow that's really quiet and warming up pretty quickly that's only been on a couple of minutes feels good (21:03) excellent that's our diesel heater fitted and the really exciting part about that is it's now time for me to hand over to Ben and Anna I really can't wait to see this campus start to take shape it's starting to look good already but by the time Ben and Anna get all their Furniture fitted I think it's going to look really cool anyway tune in next week and see what they've been up to.
  • Fitting a Solar Panels to a Sprinter

    Fitting a Solar Panels to a Sprinter

    Mark fits solar panels to the roof of the project sprinter! We also have a quick catchup with Ben & Anna.
  • How To Replace A King & Link Pin

    How To Replace A King & Link Pin

    How To Replace A King & Link Pin(00:00) Welcome back to Just Kampers. In this video, I'm going to show you how to replace the king and link pins and their associated bushes. Now today we're going to be doing a Porsche Speedster, but it is exactly the same as the VW Beetle right the way up to 1965. So the first thing I noticed with this Porsche is that we have a little bit of top-to-bottom movement on the actual kingpin itself, so I've adjusted our wheel bearing up snug, so I now haven't got any wheel bearing movement, and I can actually top to bottom it and(00:29) I can feel that I've got that movement in the kingpin and I can put my hand behind and do it and actually feel the movement there so I'm going to go ahead by removing the road wheel and our drum and uh getting it stripped down so we can get those king and link pins in, so this is our king and link pin assembly off of the vehicle now as you can see these are our link pins so these pins go through here there's bushings in here, and then we have shims either side as well and that helps us determine the right angle for our stub axle and in the (01:01) centre goes through is our kingpin, and that's where we've got wear on this item at the moment, so we've got movement in here. So effectively our stub axle is doing that when it's on the car so we're going to get that strip firstly we're going to clean it because it's absolutely filthy as you can see all the old grease and rubbish so we get that clean and then we can get the rest of these uh link pins pushed out they're fairly tight in there at the end. I mean, they're loose when they're in there like that, obviously (01:32) we've got to draw these right out on both sides on here as well so let's get it cleaned up and see if we can get it dismantled so back on the bench nice and clean I've managed to drift our link pins out and I've used a punch and a copperhead hammer to do that quite simply, and as you can see these are all the shims that go with our link pins now there's 10 shims that go for the top link pin and tensions that go for the bottom you may have six one side for the other four one side six the other in the manual once (02:02) you measure the offset of the arms which I'll go through with you it tells you how many shims to put either side whether it's on the inside or the outside but again I'll go through that when we get to that point so our next point of work on here is to remove these limping bushes now these drift out quite easily with a hammer and a socket you can do it on a press if you've got a press, if you haven't got a press to hand let's say a hammer and socket will do it so that's how we're going to do it because we haven't got a press here at (02:28) the moment so I'll show you guys how to do it without a press. I'm going to use the thighs because it's nice and solid so we're going to place are arm on here like so get it nice and flat use our socket and we're just going to get these bushes moving yeah as far as that one goes again same with this one you've got them started I'm just going to place them in the jaws of the vise I'm not going to do them up but I'm just going to use that as a support and also make sure we're on the flat so we're not damaging this surface on the other side (03:15) tap through make sure we've got clearance just open up a little bit more to finish off with a longer one nice and gently with our copper hide small same again as long as we're across the jaws got good support on this face we can tap these out quite easily sometimes if they're really tight you will need a press so if you find you can't get them to move you'd probably have to go to your local engineering shop and get them to press them out for you nine out of ten times are generally just just tap out with a hammer and a socket (03:56) there we go so drifting the king pin out can be quite tough because it's very tight in the center part and loosen these bushes this is where it wears in these bushes here so we have to force this through here now we even can use that with a hammer and a punch or if you find that it's really stiff again you'll probably have to get that pushed out by your in local engineering company on their press I've managed to get this to move so I've used the old link pin and use the old link pin to drive our kingpin out and (04:27) then I've used one of the old link pin bushes to allow that Kingpin to slide through again I'm using the voice because the vice is nice and solid so we'll try and get that last bit out okay so the last little drift Manchester knock that pretty much all the way home so I'm gonna have to and get that off like so so obviously you can see the old Kingpin starting to come out take that out I'm going to have to use a longer punch to get down there to knock the rest of it out again I will use the old bush in from the king from the link pins (05:07) just keep tapping away so we're very nearly there drifting our pin out we've only got a tiny bit left in there and we're going to use the vice Jaws to use the face to be able to tap our last bit through so pretty close now just going to tap our last bit through so you need to take a little care and not hitting your hand here so I'm saying if you don't feel comfortable using the hammer with the drift it may be worth getting the engineering company to push down for you. I'm so close now, there we go, we're out (05:42) stop axle with our thrust washer on there we need to retain that we're going to replace this there's a nylon bush in there as well so we'll replace that so incidentally if your kingpins not tight into your Hub then you'll probably need another hub assembly because the Kingpin should be tight in this section here and it should be free to swivel in the bushes in this part of our link pin assembly so these bushes are the next job for us to push out some which we'll do that's our next little job so that was good there's our old Kingpin (06:19) so I suspect all are aware was in our bushes as it was extremely tight to come out of our stub axle so again we're going to set this up in the vise and then using a bit of tube that I've cut to the right it's the right diameter tube I've just cut it and made sure I've got a nice straight edge we're going to use that to tap our bushes out and see what happens we need to put something between here so we don't damage this part and so that felt pretty tight so I'm going to put that okay see if we can get them moving (07:02) so now we have our kingpin removed we've managed to drift that all the way through so we don't need that we're going to replace that then we can take the stub axle off of our link pin hub part like so and in here is a thrust washer so in the cap is just a nylon washer and a cap we will be replacing that this is what we need to retain here this is our thrust washer so we get that nice and clean we'll keep that and as I say we have a new nylon washer to go on it that's that so we're back to our link pin part and our kingpin bushes are (07:36) still in here so we need to drift these out next that's our next job so we're going to do that on the vise like so so we need to support the part as I say because we're using a drift again if you're using the press you still need to support this part I'm going to use the vise so we can support that I have a piece of tube I've already done one I've had a piece of tube that is a good diameter it's a good correct diameter to fit over the sit on top of the bush sorry and that should help us drift that through so let's see if we (08:10) can get that moving first I feel like I moved straight away again make sure that we're pushing the bush in between the jaws of the vise that's our old bush drifted through do the same with the other side there we go right so that's our bushes removed so we give these another good clean up now make sure we've got some good faces and we haven't done any damage today which no we haven't that's good make sure they're all nice and clean we'll take our grease nipples out and clean through there as well make sure we haven't got (08:54) any debris behind there obviously we don't want to be pumping grease into it and moving debris around our new bushes so let's get that clean ready to fit our brand new kingpin bush into our thrust face side so again we're going to use our solid part of ice we're just going to drift him down until he's flush using our little bit of chew that's the right diameter to sit on the bush like so it's just going to gently tap them into place lovely so it was just a bit high still so we're just going to go down to this (09:30) just flush or just under foreign being broached off as it was going in it's nothing to worry about it's just a Bush fitting in there nice and tight then we do the same with the other side this time we have to come through this side you could do it through that way if you had a smaller punch and another press that side on on the press as we're just tapping it in with our Hammer we're going to use coming from this side you can use our tube make sure we started nicely yeah so you have to make sure that bush is square before you start driving him (10:12) through as you can see he's driving through nicely so there's a little bit material broached off from the outside of the bush but there's nothing to worry about so we'll keep going for these flush yeah good he's down through and he's gone down far enough we can get our gun down far enough so we can get our link pin bush through okay the next thing we need to do is just file out these grooves now those grooves are to file out to hold our cap for our thrust washer assembly so we'll do that next now I've clamped him in the Vise with a (10:48) little bit of leather just to protect our faces and then I'm going to go through with our file and file our grooves for our front washer to locate it taking care only to file the bush and not the uh length in arm, nice so we've got our lovely groove through there that'll hold the cap in place we have our nice new bushes pressed in I've cut the groove out for the thrust washer cap to sit into so our new kingpin doesn't fit through the bushes yet the reason it doesn't fit through the bushes yet is because we need to ream those bushes now we need to (11:24) ream those bushes so they're in the same plane as each other so we can't just ream one and then ream the other they need to be rimmed together so we do have a special reamer here this is our special agreement now this is ring to 18 millimeters so we'll place it through our first brush as you can see then it will guide through the second Bush we'll cut the first one and then we'll guide through back the other way now if you don't have an 18mm reamer that's this length because obviously you need to go to through both bushes at the same time (11:58) then you need to take it to your local engineering shop and get them to put an 18mm reamer through it either on a machine or with a hand reamer like this so that's what we're going to do next I'm going to get it in the Vise and we're going to get it reamed let's do it so we're going to start this side I've got a bit of leather in the vise we're just going to put a little bit of cutting fluid on our reamer or a little bit of oil if you haven't got cutting fluid just something to give it a bit of lubrication take the friction away when (12:25) we're cutting so we're going to slide this in as I say the bottom part is slightly smaller than the cutter and that acts as a guide and now we're going to put the flat jaw pliers here so I can get onto the drive side bit I'm just going to put a little bit of force down and ring through in one direction until we're through it does feel like it's cutting nicely just again taking our time with it felt like it went through then yeah it did excellent that's the first bush cup and remove our material that we've cut out gently withdraw our reamer backwards (13:09) or the opposite direction to which we cut so right good just give that a wipe and move this to the edge so we're going to cut through the bottom bush now as well so we've cut our top Bush using the bottoms of guys and now we're going to cut the bottom brush using the top as the guide so I want to be able to make sure that I can go all the way through the reamer a little bit more cutting oil on the so you can slide him through so obviously we've already cut the top bush slide through that fairly straightforly easily (13:39) right now we're down to cut our second bush so the same again I'm using flat drill pliers just gently apply some nice pressure downward of course it's now using our top guide our top Bush as a guide to parallel cut the bottom so there we go through let's cut through nicely so we're going to draw that all the way through now it's good so there's no chattering on the face there looks lovely we've managed to parallel ream all the way through both bushes so let's give that a clean up and fit our kingpin let's try our nice new (14:20) kingpin in our nice new kingpin bushes that we've just reamed with no grease or anything these it's nice and clean and dry again no grease or oil on that any goes so the Kingpin should be able to go through both bushes should be easy to turn like it is but have no play so if I grab hold of this and lift this yep no play that end no play that end so we've parallel roomed that perfectly hold link pin to drive the rest of our new kingpin through so you can hear it's getting quite tight on our stub axle which is good we want it tight here and (14:59) loose well loose but we wanted to be able to move on the bushes I'm just going to keep gently driving that through checking it as we go it's all looking good they're going in easier then this one came out because sometimes they're quite easy to push out sometimes they can be quite difficult we're not far away now to get this one in really close to the top of the bush now so it looks good I'm just going to check the location of where kingpin comes through looks really good so assess the kingpin in feels lovely so next we need to get our (15:41) link bushes back in ready for our new link pins to go through our new link pin bushes have a grease hole in the bottom so we have to make sure that we line that up with the bottom part actually with in line with the Kingpin so as the grease goes in it fills the Kingpin and comes into our link pin Bush as well so we must make sure there's us at the bottom now I'm going to push this in with the vise to get it started a little bit grease first again make sure that that is along with our Kingpin which happens to (16:11) be at the bottom again if you've got a press it's a lot easier to use a press but it can be done in the Vise so they are quite tight but not overly tight there we go it's starting to drive it's drive it in just make sure it's going Square before we go too far this is our new Kingpin in our new link pin bushes are in so uh we're ready to put it back on the car before we can refit our hub assembly we need to determine the offset between the lower arm and our upper arm and we do that by means of a straight edge so I'm just (16:56) going to place the straight edge across the Flats on the lower arm and what we need to do is measure that gap between our straight edge and the upper arm and that will determine where we place our shims how many each side and we can do that by referring to the manual and that'll let us know where to place them so let's check it out let me measure it and see where we are I measured our offset as eight mil so if we look at the table in the manual eight mils here and the upper torsion arm it says here that our inner shim should be number of (17:27) six and our outer shims should be a number of four and then we look on the lower arm says our inner shim should be a number of four and our outer shim should be six so again that's a total of ten with uh six one side for the other so we have to make sure we get these around the right way so I'm going to do the upper torsion arm first when we looked in the manual it said our upper outer had four shims so this is our upper pin on the outside we're going to put our four shim so I'm going to put these on first these are already lightly greased (18:03) okay that goes through there like so so four on the outer and six on the inner and then on the bottom it was six on the outer and four on the inner so let's do our six of these through give me a little jiggle to get them to sit correctly not quite in there yet there we go lovely so that's sat in there nice that one sat in there nice so we need our six shims on the inner on the top and our four shims on the inner on the bottom that should give us our correct spacing as we've measures our offset so that's ready to go on the car as I (18:44) said this is on a Porsche Speedster uh 356 is the same and these faces here where our shims push up against with our stub axle assembly these are flat as you can see these like a machined face now on the beetle there's a recess in here and that recess is for a cap and a seal so if you have the recess on the beetle the cap would fit in there and then the seal would fit within this cap I'll insert a picture so you can see what I'm talking about in the beetle I've used a ratchet strap around our damper assembly (19:16) to pull the two arms together so we've got the correct spacing to be able to put our hub assembly back on so I'm going to go ahead and put our assembly on and get it bolted up and then we can fill it full of grease so that's the king of Link pins replaced vehicle back together and on the ground for more how-to videos visit us at justkampers.com (19:46) or follow us on YouTube or Facebook
  • How to fit a CSP Front Disc Brake Kit  to your VW T2 Split or T2 Bay Window

    How to fit a CSP Front Disc Brake Kit to your VW T2 Split or T2 Bay Window

    Upgrade the braking performance of your VW T2 Bay Window with the CSP Front Disc Brake Kit From Just Kampers.
  • How to inspect the front brake drums on a VW Beetle

    How to inspect the front brake drums on a VW Beetle

    (00:00) Welcome to Just Kampers. In this video, I'm going to carry out a front brake drum inspection on a 1967 Beetle. So let's get to it so first thing I need to do is remove the hubc caps and what's really cool is this this is the hubcap puller stored in the jacking point off with the Hub Gap perfect let's crack the wheel belts off okay okay let's get it in the air so next I'm going to De adjust the brake shoes so I can remove the drum once I've got the wheel bearing undone obviously so at this stage I'm going to use my torch and the correct tool again (00:48) this is the correct brake adjusting tool cuz it's actually softer than a screwdriver a Harden tip of a screwdriver will do severe damage to the soft Adjusters in here so I'm using the correct tool and a torch I can see what I'm doing doing and I'm going to find the adjuster which is here at the front there he is and then I'm going to wind him off so just flicking around with the tool and these are on a standard thread these adjusters I'm actually winding the adjuster up the thread which actually draws the adjuster back down on the top (01:22) half and on the bottom we're doing the same we're winding it towards the bottom this time which actually brings the shoes in and then I'll go through adjustment when we're put them back together so that's some de adjusted they're not touching the drum anymore so next is to get our grease cap off this has obviously got the speedo coming through the grease cap so there's a little e-clip that holds the speedo Cable in so we're going to remove the e-clip first and then take our grease cap off so let's just gently (01:49) prise that e clip off we don't want to lose him just gently pull him off with our little screwdriver can be a little bit fiddly there he goes and I'll put them to one side for refitting next I'm going to remove our grease cap I'm going to use a lever bar and just gently prize it off obviously going to stand out the way cuz I don't want to hit myself in the face just a little gentle tap that way it start to move already so nice and nice and easy you can use a block of wood and a hammer um put a block of wood through here on the side and just tap it (02:18) off either way we don't want to damage the grease cap so whatever you do be gentle there we go off now I can take the 6 mil Allen key and undo the lock bolt for the wheel bearing adjustment let's undo that and use a pair of pliers this is left hand thread so I'm going to rotate clockwise to actually loosen the bearing cuz this is the near side front so it's on a left hand thread for the wheel bearing remove that now I can slide the drum off taking care not to drop our wheel bearing and washer so I'm going to put my thumbs (02:52) either side and that will help contain the bearing off we come just wipe the old grease off of the stub axle here lovely and then what I'm going to do is clean down with some brake cleaner I've got a catch tray underneath so let's give it a clean down with some brake cleaner we can now check our flexible brake hose also just for condition make sure it's not perished and we haven't got any cracks looks good and make sure that there's no kinks in it and it sits naturally and we haven't got any leaks around the connection here on the hard (03:26) pipe either also we can check the manufacturing date on this pipe type cuz they're all printed on these rubber hoses the manufacturing date on this is 2022 excellent so we know our brake hoses are good for another six or seven years yeah so now that we've cleaned down our brake shoes I'll start the inspection the first thing that I look at is the actual friction material on the brake shoes themselves and make sure one that it's not delaminating off of the body of the shoe and also that our our material is even all the way around (03:55) so I've got a lovely even thickness there we've still got plenty of thickness of material left the same on the bottom so that's good our shoes are working evenly next I actually check the lineing contact so looking at the top I can see that the friction lining is touching the whole of the brake drum itself so we've got a good frictional contact and that's on both shoes if we only had part contact UM there could either be uh a shape in the drum or the drums worn unevenly and we put new shoes on so this is good across the whole (04:26) width of the shoe and the whole length of the shoe next I'm going to check the wheels cylinder so I've got a small screwdriver I'm just going to peel back the rubber Dust Boot and just make sure that it's dry in here we haven't got any brake fluid leaking out between the piston and the body so that's good I'll check the other side too pop that back on yep it's good nice and dry in there also we haven't got any splits on our boots at all so they're in good condition so that's cool next thing I'm going to do is just make sure that our (04:54) wheel cylinder moves so we've got a prop fitted between our seat and our brake pedal and I've got the brake pedal about half travel and what that's done is expanded our wheel cylinder and now I can just check that both sides of the wheel cylinder move by using the lever bar gently on the brake shoes as you can see both sides of our wheel cylinder are moving so we've got no seizure there so that's all good so I can go ahead and remove the prop as you can see there's the prop I'm going to remove it now if you haven't got a prop you can have (05:23) somebody in and help you and just go half travel on the brake pedal next I can check our adjusters are free and they move well now so with just a little bit of pressure flip that round using the correct tool obviously not a screwdriver and this allow the adjuster to come up I can put a little bit of copper grease on that so we've got a little bit of lubricant on that thread so again we've got good movement there the Locking uh spring is coming back in and locking in as well so that's good sometimes these rot off and get (05:58) broken or get get bent too far as well so that's working fine I'll do the same for the bottom part of that adjuster in a moment next I'm going to deglaze the brake shoe and what I mean by Del glaze is to remove this shiny surface so I've got a 180 grit sandpaper and I'm just going to really gently not putting much pressure on at all uh all I'm doing is just taking that surface off so we can bed a nice fresh surface to our drum that's good also I just want to take this Edge down here make sure we've got a nice rounded Edge on the edge of the (06:37) shoe uh so we definitely haven't got any binding of a sharp edge on our drum so that's that one I'll do the bottom as well to check the condition of the return springs for the shoes uh this one here the big heavy one next to the wheel cylinder is obviously the biggest one uh cuz it has to return the wheel cylinder back to its stop position and push the force back against the master cylinder so we basically we look at it and we're looking for uh anything uneven so the coils are nice and even they're not stretched and distorted there's no (07:07) corrosion on it the ears that go around the brake shoes are in good Nick and it feels quite tight the same with this side on the smaller one um all looks good the coils are nice and tight and not distorted and out of place next we're going to move the brake shoes over and just put a bit of brake um bit of copper grease on the where the brake shoe touches the wheel cylinder and also where the brake shoe touches our brake adjust you can also put a little bit of copper grease on where the brake shoe touches the backing plate let me show you if I (07:44) just move that out the way moving forward this area here is where the brake shoe rides against on the backing plate now a small amount of copper grease on here is good we have to be super careful cuz we do not want any copper grease on the actual brake friction line in itself so I'm just going to put a tiny weeny bit in there careful not to get any on the shoe itself we can just gently move that back there we go got a little bit of lubricant on the actual shoe body and the backing plate I'm happy with the condition of (08:21) our brakes here we need to have a look at the brake drum now so let's go over to the bench and check it out remove the bearing out the front so that's the in with the washer and pop that on a clean bit of rag we've got here now I can now turn the drum over and just do a quick inspection and see what we got condition wise inside the drum so we're can to turn it over and have a look again with a clean rag I can just give it a wi round so what we're looking for we're looking for fractures we're looking for unevenness also wear and tear uh (08:54) corrosion if the vehicle's been stood for a while and mainly we're looking at the condition of this lip on here on the edge always builds up a bit of a li lip on the Outer Edge if it's a really deep lip what that means is that the the drum itself the material is worn away this still feels quite good it's a little bit of corrosion there nothing serious but the rest of the actual um breaking face looks really really good so we're just going to take a little bit of 80 grit to this outer very outer edge here as we we don't want this High cuz (09:23) trying to put it over our brake shoes could be a bit difficult so we're just going to literally take the Frozen the edges off here again we don't want to go across this face too much so just gently do that feels good also while we're here we can check out the the bearing at the back so the grease seal looks good we haven't had any grease going past the grease seal uh the grease in there still looks quite good it's not been flung out everywhere and overheated now we can pop our drum back on so just gently slide that back and make sure our (09:55) bearing and our washer doesn't fall out of the front seat the rear bearing and then we can put our um knut back on the front and we're just going to do it up gently to start with and going to adjust it properly once we've got our wheel on on with the nut just going to remember this is left hand thread so it's almost like we're undoing it to tighten it up so we're using our flat GW fliers we're just going to take that nut up until it seats both bearings so again not too tight but tight enough to seat everything squeeze (10:29) the grease out the bearings and we're going to back it off and then just gently with a very small amount of pressure just nip it up and leave it at that now I'm going to do the pinch bolt up nip that up doesn't have to go really tight but I just don't want that moving yet now I can move our drum and we can adjust our Brak shoes next so that's our next job using our special brake adjuster tool I'm now going to adjust the brake adjuster and all the way up and that will Jam our brake shoe against the brake drum and then back it off a couple (10:57) of clicks then do the same for the bottom one and then I'm going to go in and pump the brake pedal and that will reenter our brake shoes and then we can readjust again and get it perfect plus that's wound right up and now our shoes against the drum two clicks off one two that should be enough to move it yeah that's fine let's do the same on the bottom I locked it up again backs that off two little clicks two allows us to move it now I can PR pump the brake pedal and Center those shoes I've pressed the brake pedal (11:34) to Center our shoes obviously I've made sure that I had the drums on at that point if you doing both front drums for instance and have them both off you do the process so that both drums would be on you'd adjust them up to that point and then press the brake pedal you don't want to be pushing your brake pedal with one drum off cuz it wouldn't work you'd end up popping a wheel cylinder anyway we're there so we're going to adjust this now again I'm going to wind it right the way up until it locks and then back it off two (12:02) clicks again careful make sure I only do two clicks one two the same on the bottom again I'm going to wind it up until it locks the drum so and then back that off two clicks Although our brake drum moves now it's still too draggy so we've still got too much drag from the brake shoot against the brake drum so I need to knock the adjuster off a little bit more so I'm going to start with the top one and just knock it back one so remember I'm loosening it not tightening it and I'm going one full click so move our wheel around and then the spring sits in (12:42) the right position the little spring lug yes and all of a sudden that feels much better you say it does spin to a stop so we've got a small amount of drag which is what we want so we get good adjustment otherwise again if we had our shoes too loose then you'd have a lot pedal travel before anything happen and we need both fronts to be even also otherwise you could have one coming on before the other one so you'd end up with brake drag that way around so I'm happy with that this that's this side adjusted so I'm going to go ahead and (13:13) finish the other side too just for reference the hubnut this side is a standard thread so it's a right hand thread not a left hand and this is on the off side of the vehicle whilst we have our road wheels off it's a great opportunity to check the condition of our suspension components so with our wheel fitted back on the last last check I can do before I put our grease cap on is just double check that wheel bearing adjustment so all I need to do now is just check the top to bottom play while we're here that feels just right so there's a (13:42) tiny amount of play in that bearing now if I had to replaced a bearing and put a brand new wheel bearing in I would have done it up the same manner but I would have just taken all of that play out so when the bearing settled in you would have a little bit of play left but because we didn't replace it this was original bearing a little bit of play is absolutely perfect perfect we can now go ahead and fully tighten our pinch bolt on our hubnut then we can refit our grease cap make sure that we get our Speedo cable (14:08) to come through and put our e-clip back on then just gently squeeze them on with a pair of pliers job done Al so don't forget to talk your wheel BS let's not foret get the hubc cap tool that can go back into the jacking Point that's our brake inspection completed you should inspect the front brakes at every service interval and the rear every other be sure to follow us on YouTube Facebook and Instagram and check us out at Just Kampers. (14:47) com so until next time thanks for watching
  • How to Carpet your JK sliding door storage Pod

    How to Carpet your JK sliding door storage Pod

    How to Carpet your JK sliding door storage Pod
  • JK T5 - T6.1Sliding Door Storage Pod

    JK T5 - T6.1Sliding Door Storage Pod

    How to fit a JK T5 - T6.1 Door Storage Pod to your VW T5 - VW T6.1 TransporterHere we show you how to fit a JK Door Storage Pod to your VW T5, T5.1, T6 and T6.1 Transporter. To find out more about our sliding door storage pods visit visit our Sliding Door Storage Pods page.VW T5 - T6.1 Door Storage Pods Quality Just Kampers product, exclusive to JK. This door storage pod panel fits to the sliding door on your Transporter, giving you extra space to stash things away in your VW. Fits the nearside (left) sliding door on right-hand drive VW T5s and T5.1s built from 2003 to 2016, as well as the VW T6 and T6.1, built from 2003 onwards. They’re quick and easy to fit, and are supplied with the fir tree style fixing clips you’ll need for installation. These sliding door storage pod panels are made right here in the UK, using hard-wearing plastic which is quick and easy to wipe clean. They’re supplied as they are, finished in a simple grey plastic which will match any interior. If you want to cover your JK sliding door storage panel in carpeting to match your VW camper’s interior, you can achieve this relatively easily, but be sure to use longer clips which will take the thickness of the carpet into account.{{widget type="Magento\CatalogWidget\Block\Product\ProductsList" template="Magento_CatalogWidget::product/widget/content/grid.phtml" anchor_text="" id_path="" show_pager="0" products_count="5" condition_option="sku" condition_option_value="J48260,J48536, J48533" type_name="Catalog Products List" conditions_encoded="^[`1`:^[`aggregator`:`all`,`new_child`:``,`type`:`Magento||CatalogWidget||Model||Rule||Condition||Combine`,`value`:`1`^],`1--1`:^[`operator`:`()`,`type`:`Magento||CatalogWidget||Model||Rule||Condition||Product`,`attribute`:`sku`,`value`:`J48260,J48536, J48533`^]^]" sort_order="position_by_sku"}}Did you know that our colleagues at Just Kampers Insurance have been offering specialist vehicle insurance since 1998?You can get a great deal on insurance for a huge range of vehicles, from daily drivers to treasured campervans, and everything in between. Just Kampers Insurance works with a huge network of insurers to find you the best deals, and they're so confident that they'll send you a £50 Just Kampers gift voucher if they can't beat your like-for-like quote! Insuring your vehicle with Just Kampers Insurance also gets you a 10% discount on orders here at Just Kampers, which could save you even more money!Get an Online Insurance Quote Today{{widget type="Magento\Cms\Block\Widget\Block" template="widget/static_block/default.phtml" block_id="232" type_name="CMS Static Block"}}
  • How To Change The Chrome Surround & Scraper On A T2 Bay Cab Window

    How To Change The Chrome Surround & Scraper On A T2 Bay Cab Window

    Mark shows us how to replace a Chrome Surround & Scraper On A T2 Bay Cab Window
  • How to fit roof bars and cross bars to your VW T5 or VW T6 Transporter

    How to fit roof bars and cross bars to your VW T5 or VW T6 Transporter

    Here JK's Mechanic Mark Mark shows us how to fit roof bars and cross bars to your VW T5 or T6 Transporter.  To find out more about our Roof Bars or Cross Bars visit visit our Roof Bars and Cross Bars page.How to Fit Roof Bars and Crossbars to Your VW Transporter Here’s a quick guide on how to install a set of roof bars and supporting cross bars on your VW T5 or VW T6. Whether you’re planning a road trip with your Transporter and need to maximize storage space, or just like the look, you’ll be able to fit a set of roof rack bars in about half an hour if you follow these steps. Fitting roof bars and crossbars can make a real difference to how much you can use your van, allowing you to carry bulky items such as bikes, kayaks, or luggage with ease. In this guide, we'll walk you through the step-by-step process of fitting roof bars and crossbars to your vehicle, ensuring a secure and hassle-free installation. Step 1: Get everything ready Before you begin, make sure you have all the necessary parts and tools handy. This includes the roof bars and crossbars themselves, as well as the fittings which they’re supplied with. You’ll also need silicone sealant, a 5mm allen key, a screwdriver, and the instructions! Step 2: Fitting the roof bars Start by using a 5mm allen key to remove the blanking screws from the roof of your vehicle.You’ll likely need to use a step ladder to get to these blanking screws, so we recommend that you have someone with you to help keep you safe and steady while you’re up there. With the blanking screws removed, apply silicone sealant around the holes to prevent water from getting in and causing damage to your van. Once the sealant is set, place the spacers on the roof to create a flat surface for the roof bars to sit on.You can now attach the gaskets to the roof bars and position them on the spacers.Secure the roof bars in place using the bolts provided, and check to make sure that you’ve got a snug fit.Once you’re happy with how everything is fitting together, tighten the bolts evenly along the length of the roof bars.Insert blanking bungs into the remaining holes to complete the installation. Step 3: Fitting the crossbars Start by assembling the cross bars by attaching the ends and rubber gaskets. Loosen the clamps underneath the crossbars so they’re ready to install. Position the crossbars in between the roof bars, and make sure they’re evenly spaced. This step is definitely easier and safer when you’ve got someone else with you! Tighten the clamps on the cross bars using a screwdriver, and make sure they’re secured firmly. Check that the crossbars are straight, and adjust if necessary.Finish up by inserting blanking caps to cover any exposed holes and complete the installation. Step 4: Final checks Once all roof bars and crossbars are fitted, double-check that everything is securely tightened and properly aligned. Test the stability of the bars by gently applying pressure, and making sure that they’re not wobbling or shifting in place. You can go back and adjust the cross bars or roof bars if you think they need it, but if you’re happy with how it all looks and feels then you’re all done! Safety Tips Since you’ll be working at height (even if it’s just a little bit off the ground!) we strongly suggest that you have someone else with you to help keep you safe, and to pass you tools, parts, and tea to make the whole job go faster! Final Thoughts Fitting a set of roof bars and crossbars to your VW Transporter is a straightforward process, and can greatly enhance its functionality. By following this step-by-step guide, you can confidently install these accessories and prepare your van for your next adventure. For quality roof bars and crossbars, visit www.justkampers.co.uk and explore our range of products designed to meet your needs. Happy travels!{{widget type="Magento\CatalogWidget\Block\Product\ProductsList" template="Magento_CatalogWidget::product/widget/content/grid.phtml" anchor_text="" id_path="" show_pager="0" products_count="5" condition_option="sku" condition_option_value="J31268, J46266, J19543, J46268" type_name="Catalog Products List" conditions_encoded="^[`1`:^[`aggregator`:`all`,`new_child`:``,`type`:`Magento||CatalogWidget||Model||Rule||Condition||Combine`,`value`:`1`^],`1--1`:^[`operator`:`()`,`type`:`Magento||CatalogWidget||Model||Rule||Condition||Product`,`attribute`:`sku`,`value`:`J31268, J46266, J19543, J46268`^]^]" sort_order="price_high_to_low"}}Did you know that our colleagues at Just Kampers Insurance have been offering specialist vehicle insurance since 1998?You can get a great deal on insurance for a huge range of vehicles, from daily drivers to treasured campervans, and everything in between. Just Kampers Insurance works with a huge network of insurers to find you the best deals, and they're so confident that they'll send you a £50 Just Kampers gift voucher if they can't beat your like-for-like quote!Get an Online Insurance Quote Today{{widget type="Magento\Cms\Block\Widget\Block" template="widget/static_block/default.phtml" block_id="232" type_name="CMS Static Block"}}
  • How to fit side bars to your VW T5 or VW T6 Transporter

    How to fit side bars to your VW T5 or VW T6 Transporter

    We show you how simple it is to fit side bars to your VW T5, T5.1, T6 and T6.1 Transporter. To find out more about our sidebars visit visit our VW T5 - T6 side bars pageHow to fit a set of side bars to your VW Transporter Here’s a quick guide to installed a set of side bars to your Volkswagen Transporter. Whether you’re looking to protect the sides of your van, or just want an aesthetic upgrade, you’ll be able to fit a pair of side bars in no time. This guide will walk you through the steps for fitting side bars to your vehicle, and have your T5 or T6 looking totally different in no time.   Step One: Getting everything ready Before you start, you’ll need to gather up all the tools that you’ll need, so that everything’s in easy reach. There’s nothing worse than having to stop half way through a project to find the right size socket! The tools you’ll need are: a 16mm spanner, a 13mm spanner, an 8mm and a 10mm socket, a pair of safety glasses, and additional tools for removing plastic parts of your Transporter’s undertray. If you’ve got your side bars from Just Kampers, they’ll come with the fixings needed to fit them, but you may need to track down some nuts, bolts, and washers if you’ve got a set of side bars which don’t include them. Step Two: Preparing your Transporter Carefully lift your van up onto axle stands, taking sure to use the correct jacking points underneath your Transporter and a jack which can support the weight of your vehicle. Once that’s done, you’ll need to access the underside of the van to remove the fixings from the sides of the underbelly pan, using your sockets. Make sure you set the pan’s securing bolts aside for later, so you know where they are! You don’t need to remove the whole pan, just removing the side bolts will give you access to the area you’ll need for fitting the side bar mounting brackets. Step Three: Installing the mounting brackets Take your four mounting brackets and sort your front brackets from the rear, and the nearside (left) from the offside (right). When it comes time to fit the relevant bracket to the correct place on the vehicle, you’ll only need to lift the plastic pan away from the underside of your vehicle, so that you can get to the mounting points for the brackets. At the front of your Transporter you’ll find a pair of rubber bungs on either side of the vehicle, which you’ll need to remove so that you can install your mounting bracket. Line up the holes for the fixings, and then slot the bolt through, followed by the fixing plate. Push the bracket up in place over the bolts, and then secure it with the plain washer, locking washer, and then the nut. Do them up hand tight for now, so that they’re held in place. You’ll need to go back and tighten them up properly with your socket set later, however. Step Four: Fitting the Side Bars Now you’re ready to fit the side bars to the mounting brackets. Before you do so, it’s a good idea to test the thread on the bolts from your fitting kit on the side bars themselves, to make sure that they fit properly. It’s much easier to test this out now than to find out you’ve got your bolts mixed up during the actual installation! All you need to do now is to rest the side bars on the ground and align them with the mounting brackets, then slide the side bars into position, ensuring they cover the brackets evenly. You can adjust the side bars slightly from side to side, to make sure they’re looking exactly how you want them. Once you’re happy with how the side bars are sitting, you’ll just need to tighten the fixing bolts holding the mounting brackets to your vehicle, and then secure the bolts securing the side bars to the mounting brackets. It’s important to use the correct tools to make sure that these are properly secured, and won’t shake loose as you drive. Step Five: Final adjustments You may find that you need to cut some small holes or notches into the plastic under tray to ensure that it fits correctly over the mounting brackets, but if you’re careful and only cut away what you need to, it won’t cause any problems.  With all of this done, you can apply some underseal or rust prevention such as nuxudol or Waxoyl to prevent the underside of your Transporter from being damaged by water, mud, and general road grime. Once that’s all done you can carefully lower your van back to the ground, and allow the underseal some time to dry and set if you’ve applied any. And that’s it, you’re done! We hope you found this guide helpful, and hope you enjoy your new side bars!{{widget type="Magento\CatalogWidget\Block\Product\ProductsList" template="Magento_CatalogWidget::product/widget/content/grid.phtml" anchor_text="" id_path="" show_pager="0" products_count="5" condition_option="sku" condition_option_value="" type_name="Catalog Products List" conditions_encoded="^[`1`:^[`aggregator`:`all`,`new_child`:``,`type`:`Magento||CatalogWidget||Model||Rule||Condition||Combine`,`value`:`1`^],`1--1`:^[`operator`:`()`,`type`:`Magento||CatalogWidget||Model||Rule||Condition||Product`,`attribute`:`sku`,`value`:``^]^]" sort_order="price_low_to_high"}}{{widget type="Magento\CatalogWidget\Block\Product\ProductsList" template="Magento_CatalogWidget::product/widget/content/grid.phtml" anchor_text="" id_path="" show_pager="0" products_count="5" condition_option="sku" condition_option_value="J29213" type_name="Catalog Products List" conditions_encoded="^[`1`:^[`aggregator`:`all`,`new_child`:``,`type`:`Magento||CatalogWidget||Model||Rule||Condition||Combine`,`value`:`1`^],`1--1`:^[`operator`:`()`,`type`:`Magento||CatalogWidget||Model||Rule||Condition||Product`,`attribute`:`sku`,`value`:`J29213`^]^]" sort_order="position_by_sku"}}Did you know that our colleagues at Just Kampers Insurance have been offering specialist vehicle insurance since 1998?You can get a great deal on insurance for a huge range of vehicles, from daily drivers to treasured campervans, and everything in between. Just Kampers Insurance works with a huge network of insurers to find you the best deals, and they're so confident that they'll send you a £50 Just Kampers gift voucher if they can't beat your like-for-like quote! Insuring your vehicle with Just Kampers Insurance also gets you a 10% discount on orders here at Just Kampers, which could save you even more money!Get an Online Insurance Quote Today{{widget type="Magento\Cms\Block\Widget\Block" template="widget/static_block/default.phtml" block_id="232" type_name="CMS Static Block"}}
  • How To Cut And Fit Windows

    How To Cut And Fit Windows

    Mark shows us how to cut and fit windows to a VW T6.1 panel van.
  • Video: Campingaz Series 400 Double Stove and Toaster

    Video: Campingaz Series 400 Double Stove and Toaster

    Looking for a reliable camping stove and toaster combo for your outdoor adventures? Look no further than the Campingaz Series 400 Double Stove and Toaster! In this video, we take a closer look at this convenient and efficient cooking solution, perfect for camping trips, picnics, and more. Get ready to enjoy delicious meals on the go with Just Kampers and the Campingaz Series 400 Double Stove and Toaster.
  • JK Solar Screen

    JK Solar Screen

    Our new and exclusive JK Solar Charging Screen is one of the coolest products we’ve made in our 30+ year history! Designed by JK and Texenergy, it’s a fantastic way to ensure that your main vehicle battery, and your leisure battery, never runs out of juice.
  • How to professionally carpet your van conversion

    How to professionally carpet your van conversion

    Time to carpet the inside of Project 2022!
  • JK Guide: Fitting a 240v Plug and Play system

    JK Guide: Fitting a 240v Plug and Play system

    Eazy 240v Plug & Play Electric Hook Up Conversion Kit - Under Body Inlet:
  • Just Kampers Fitting Guide to Installing Side Glass

    Just Kampers Fitting Guide to Installing Side Glass

    View our Just Kampers Video guide to show how you can simply fit our range of side window glass to your van.
  • The Easy Spinner double passenger seat swivel base for VW T5 and VW T6 Transporters

    The Easy Spinner double passenger seat swivel base for VW T5 and VW T6 Transporters

    Easy Spinner Double Passenger Seat Swivel Base for VW T5 and T6Here we demo our Easy Spinner Double Passenger Seat Swivel Base VW T5 & T6 Transporters. To find out more about our Swivel Seat Bases visit our Seat Covers and Swivel Seat Bases page.Easy Spinner Double Passenger Seat Swivel Base for VW T5 and T6 
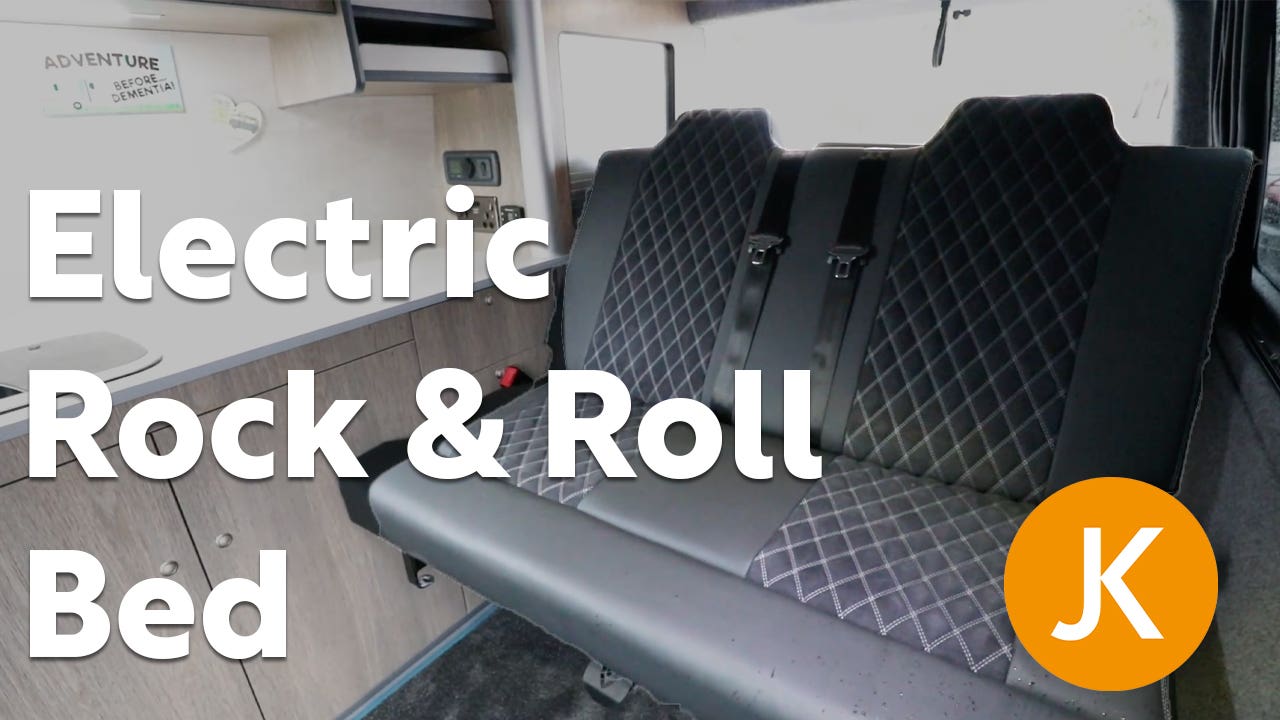
Want to make the most out of your VW Transporter? Spend an hour fitting an easy spinner seat base beneath your double passenger seats, and you'll be able to face into the back of your camper in moments. This swivel seat base is fully M1 safety tested and certified and allows you to move your seat position into the back of the campervan so you can sit at the table, or simply spin in place. At a glance: Made to a high standard with British mild steel, right here in the UK, Fits all models of the VW T5 and VW T6 quickly and easily with simple tools, It lets you move the seat on runners into the cargo area of your van, making it even more useable Allows you to use your double passenger seats to sit at the table in the back of your camper, Spins both ways, so you can roll your seats into the back and look out of the sliding door, too! The easy spinner swivel seat base is a super useful and really innovative product, and will totally transform the way you use your T5 or T6 while you're out and about on camping adventures. Will this fit my vehicle? Fits beneath the RHD double passenger seats on all VW T5s built from 2003 to 2015 and VW T6s built from 2015 onwards. This includes the facelift T5.1 and T6.1 models, too. How to install your new easy spinner swivel seat base: Full fitting instructions are included with the box when you buy your new seat base. These are clearly written and easy to follow. It's a four-stage process and covers removing the seat, modifying your floor bolts, fitting the swivel base, and reinstalling the seats. Photos are included with the instructions, too. It should take you around one hour to install the easy swivel, and you'll need a ratchet with a 16 mm socket, and a metal saw or angle grinder to slightly modify your floor bolts. Please be aware that fitting this seat base will raise the height of your seating position by 5.7 cm, which is the height of the swivel base. Fully pull-tested and M1 certified: The easy spinner double seat swivel base has been out through pull testing and has received its M1 certifications for passing this test. Pull testing is the go-to safety test for ensuring the mounts and fixings of vehicle seats are strong and secure enough to withstand the pressures of a vehicle collision. The test simulates a crash at 30 miles per hour into solid concrete and subjects the seat to the same pressures experienced during such a crash. Seats which pass this test are awarded the M1 standard, which has been set out by the European Union for passenger-carrying vehicles that carry no more than eight seats. The pull test also ensures that the seatbelt mounting points remain located in the correct position, in relation to an adult's hip and shoulder. Having these mounting points placed correctly reduces the risk of severe injury in the event of a crash. Size, weight and materials: 5.7 cm tall 53.5 cm wide, 60 cm long, Weighs 38 kg, Made from 6mm thick British mild steel. {{widget type="Magento\CatalogWidget\Block\Product\ProductsList" template="Magento_CatalogWidget::product/widget/content/grid.phtml" anchor_text="" id_path="" show_pager="0" products_count="5" condition_option="sku" condition_option_value="J46473," type_name="Catalog Products List" conditions_encoded="^[`1`:^[`aggregator`:`all`,`new_child`:``,`type`:`Magento||CatalogWidget||Model||Rule||Condition||Combine`,`value`:`1`^],`1--1`:^[`operator`:`()`,`type`:`Magento||CatalogWidget||Model||Rule||Condition||Product`,`attribute`:`sku`,`value`:`J46473,`^]^]" sort_order="position_by_sku"}}Did you know that our colleagues at Just Kampers Insurance have been offering specialist vehicle insurance since 1998?You can get a great deal on insurance for a huge range of vehicles, from daily drivers to treasured campervans, and everything in between. Just Kampers Insurance works with a huge network of insurers to find you the best deals, and they're so confident that they'll send you a £50 Just Kampers gift voucher if they can't beat your like-for-like quote! Insuring your vehicle with Just Kampers Insurance also gets you a 10% discount on orders here at Just Kampers, which could save you even more money!Get an Online Insurance Quote Today{{widget type="Magento\Cms\Block\Widget\Block" template="widget/static_block/default.phtml" block_id="232" type_name="CMS Static Block"}}
  • Just Kampers Engine Fire Fighter Demo

    Just Kampers Engine Fire Fighter Demo

    We’ve been looking for a simple to fit, cost-effective fire suppression system to fit to our own VWs but baulked at the price of some of the products on the market. So we went out looking for the right product at the right price and are pleased to introduce exclusively to Just Kampers, The Engine Fire Fighter. Our VWs are part of the family, a lot of time and emotional investment is tied up in our vehicles. The Engine Fire Fighter is designed to protect you and your vehicle should an engine fire develop. Featuring a pressurised flexible tube containing FE-36, a non-corrosive non-toxic, environmentally friendly agent that leaves no residue and can be easily cleaned in event of activation. Even after 4 tests, we reassuringly found minimal damage to our test engine. The Engine Fire Fighter is a simple and effective way to put out engine fires, that you may not even know are happening on a rear-engine vehicle. And takes less than 10 minutes to fit and no tools required. Available in two lengths, either 2m or 3m, the tube system is easy to install using the supplied ties and requires no other power or external trigger. In the event of a fire, the tube will activate when the temperature reaches 120 degrees Celsius extinguishing a fire and protecting you and your pride and joy. We recommend the 2-metre length for smaller engine bays such as the Beetle or Type 3.
  • Prepare Your VW For An MOT

    Prepare Your VW For An MOT

    In this handy video guide the Just Kampers experts show you how to prepare your Volkswagen for it's MOT. The video gives you lots of useful hints and tips to help prevent any wasted trips to the MOT test station. We highlight some of the most important areas to check on your VW before so that you can avoid a re-test.
  • Jack up the front of a T2 Bay

    Jack up the front of a T2 Bay

    The team from Just Kampers show you how to safely Jack Up the front of your VW T2 campervan to minimise the risk of damage or injury while you are working on your Volkswagen vehicle.This video guide compliments the Just Kampers video "How to safely Jack Up the rear of your VW T2 Campervan." You will learn how to use the trolley jack and axle stands without damaging the underside of your VW Type 2.
  • Jack up the rear of a T2 Bay

    Jack up the rear of a T2 Bay

    In this video Just Kampers show you how to Jack Up the rear of your Volkswagen T2 Campervan safely and efficiently, making sure not to cause damage to your VW Bus or to yourself.The team talk you through the basic principles of Jacking Up the rear of your VW Type 2, show you how to use the Trolley Jack and explain where to place the Axle Stands.
  • Remove the front wheel bearings on a T2 Bay

    Remove the front wheel bearings on a T2 Bay

    The Just Kampers team are back to show you how to simply and quickly remove the front wheel bearings on your Campervan.In this video the JK experts explain how to inspect the wheel bearing.  They show you how to check the condition of the wheel bearings on your VW Transporter, Volkswagen Camper and VW Beetle. Finally you will learn how to remove the front wheel bearing.
  • Replace the front wheel bearings on a T2 Bay

    Replace the front wheel bearings on a T2 Bay

    In this video the Just Kampers team show you how to remove and replace the front brake caliper and front brake disc on your VW T2 Campervan or VW Beetle quickly and easily. This video guide follows on from the Just Kampers video "How to remove the front wheel bearing on your VW T2 Bay”. It is worth seeing before you watch this guide to replacing the front wheel bearing on your classic Volkswagen Camper or VW Beetle. To purchase parts featured in this video please visit:https://www.justkampers.com/vw-t2-bay-window-parts/t2-bay-front-suspension-steering-wheel-bearings/wheel-bearings-seals.html
  • Replace the rear brakes on T2 Bay (1/2)

    Replace the rear brakes on T2 Bay (1/2)

    The Just Kampers experts show you how to refit the rear brake shoes on your VW. In this video guide the JK team explain how to reassemble the rear brake shoes for classic VW Beetle, VW T2 splitscreen and VW T2 Bay window models. Once the rear show is reassembled you will see how to refit the rear shoes to your air cooled classic. To purchase parts featured in this video please visit:https://www.justkampers.com/vw-t2-bay-window-parts/t2-bay-braking-system-parts/brake-shoes-fitting-kits/rear-brake-kit-vw-t2-bay-1973-1979.html
Page