Why upgrade?
Fitting a pair of twin carbs – in our case, dual 34ICT Webers – is one of the most effective bolt-on engine modifications you can make. Aside from the small improvement in performance they offer, when set up properly a pair of carburettors should give you an actual advantage when it comes to miles per gallon.
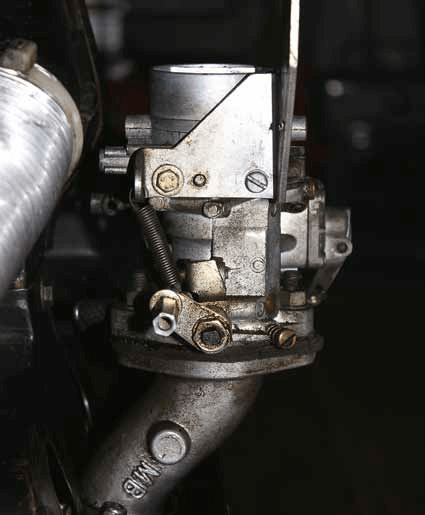
However, over time, carbs can drift out of tune. And depending on how often the Bus is used, the quality of the fuel put in it, the state of the fuel lines and even the insides of the fuel tank, will eventually become dirty inside. Add in the tiresome habit of gaskets failing over time and it’s common for engines to begin to run a little rough. This is what happened with ours. Some four years after the carbs were fitted, we found ourselves suffering from occasional spitting back, generally rough running and appalling mpg. So we decided to pop the carbs off, give them a quick refresh and set them up again properly.
The first thing we found was a failed inlet manifold gasket, which certainly wouldn’t have been helping. But, when we stripped the carbs down, we found plenty of sediment inside, which has the potential to mess with the flow of fuel and air through them and, in turn, mess with the smooth running of the motor.
To remedy the situation, we bought two rebuild kits from Weber and Dell’Orto specialist Eurocarb (www.dellorto.co.uk) for £26 each. We also bought a handful of additional inlet manifold gaskets – both to the carb and to the heads – in case more needed replacing, and invested in a two-dial carburettor synchroniser, which cost £27 delivered through eBay. While designed for motorbikes, these show in real time how the carbs are working relative to each other and help hugely in setting a dual carb system up.
Check your fuel lines!
The final thing we bought was a fuel hose update kit, which came as a bundle from Machine 7. It can’t be stressed enough that regular checking of the condition of your fuel lines is essential. The bundle kit contains hose suitable for use with the ethanol content in modern fuel and plain rubber hose with no over-braiding, so you can check for damage or wear any time.
Before we started, we decided to remove the engine from the Bus since it makes the job so much easier. It may seem a lot of extra work, but it is well worth the effort as you can have everything laid out in front of you, rather than trying to work in the engine bay like a blind contortionist…
Safety first
It’s also worth pointing out that petrol is pretty horrible stuff and, regardless of how careful you are, there will inevitably be some spillage, or at least fumes from the carbs, so make sure you work in a well-ventilated area and don’t smoke, weld or grind while you’re doing this job. Remember, petrol fumes are heavier than air and will collect on or near the ground, so work carefully.

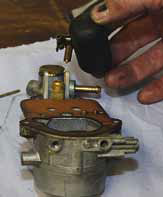
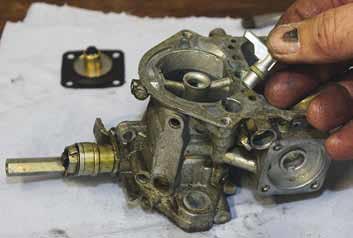
01 Having removed both carburettors from the engine, start the strip down by removing the throttle return springs. These were fitted between the air filter bracket and linkage on ours.
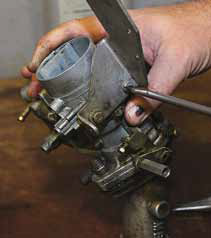
02 Then remove the filter mounting bracket, held on here by a set screw and a single 10mm bolt.
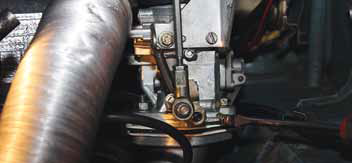
03 Then undo the two nuts holding the inlet manifold onto the bottom of the carburettor.
04 Separate the inlet manifold and the carburettor. If, like us, you used a spacer plate to raise the throttle linkage to clear the dynamo when they were fitted, keep them for re-use later.
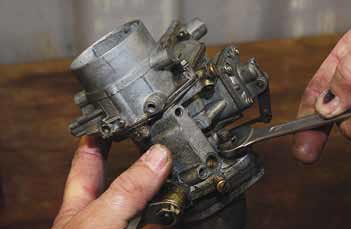
 05 Now tip the carb up so any fuel still in the float chamber will drain out of the filler spigot into a suitable container and then set the carburettor on the bench. Start by removing the four screws holding the top of the carb to the base.
 06 With the screws removed, a knock from underneath on the lid with a screwdriver handle will separate the two halves. Be ready as there will inevitably still be fuel left in the float chamber that will spill.
 07 Starting with the top of the carb, turn it upside down, push out the pin holding the float to the two aluminium posts and remove the float and the attached needle valve.

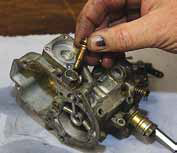
08 Remove the gasket, which should just lift off, and then undo the needle valve housing from the lid of the carb. Make sure you also remove the metal washer, which might be more stubborn.

09 Remove the brass nut on the bottom of the fuel inlet and then remove the plastic fuel filter.
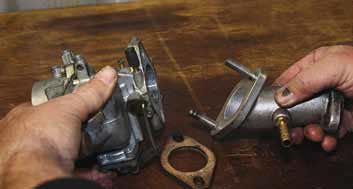
10 And that’s the top of the carb disassembled. The parts on the right are the ones to keep and re-use (the float, pin and filter housing), while the parts on the left will be replaced with new from the rebuild kit, and include the filter, needle valve and gasket.
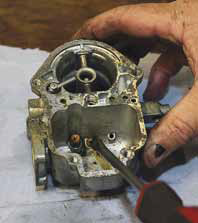
 11 Time to switch to the base of the carb. You can clearly see some of the dirt build up in the bottom of the float chamber. First off, remove the split pin on the side of the base, then the actuating rod for the diaphragm on the pump jet.

12 Undo the four retaining screws and remove the cover of the pump jet diaphragm, as well as the spring. Keep the spring, but a new diaphragm will be included in the kit.
 13 Undo the retaining grub screw, which comes in at an angle to the right of the housing, then remove the idle jet and holder. Now remove the idle mixture screw from the very base of the carburettor and look after the spring.

14 On the top of the base, undo the air corrector jet, which holds the emulsion tube in place. You may need to prise the tube out to release it, but go very carefully as it is easy to damage these parts.
 15 In the bottom of the float chamber, undo and remove the main jet. This controls the main fuelling for the whole carb.
16 We also removed the pump jet to give it and the passageway is sits in a good clean.
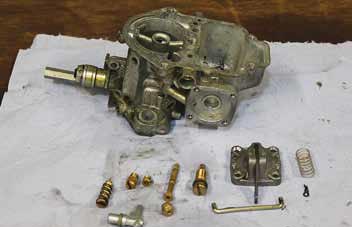
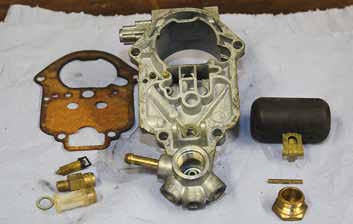
17 This is what you should be left with – the carb body and a collection of brass jets and aluminium parts, all of which need a good wash.
 18 For the smaller parts, it can be useful to house them in a tea cage. This stops them getting lost and allows the solvent to move amongst them to loosen dirt.

19 Time to clean the carburettor base, top section and the smaller parts. Some advocate carb cleaner for this, others the cheapest diet cola you can find (seriously). We went old school and used super unleaded petrol. Outside, of course.

20 Clean in all nooks and crannies with a stiff brush, then blow all passageways through with compressed air to dry the solvents and ensure they are clear of debris. If you don’t have a compressor, you can use cans of compressed air designed for use with air brushes.
 21 The rebuild kit should contain an inlet gasket, carb gasket, pump diaphragm, inlet filter and needle valve.

22 Fitting is the reverse of removal, starting with the new diaphragm. Tip: fit the four screws through it first as shown to prevent nipping it when you fit the cover.
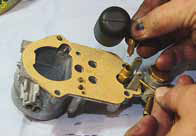 23 Tip: apply a thin layer of grease to the carb gasket before you fit it to the top section. This will keep it stuck to the top and in place as you assemble it. With that in place, fit the new needle valve housing to the carb top, the new needle to the float and then re-fit the float using the brass pin. Note the gasket stuck in place.

24 Hold the top section vertically as shown to set the float level. In the neutral position, it should be 6mm from the base of the gasket.
 25 As you hold the float, and hence the needle valve, fully open, the distance between the float and the base of the gasket should be 12mm. Any different and you need to bend the float arm to ensure these measurements are right.

26 With the carbs back together, we can start setting them up. On each, fit the slimmest feeler gauge between the throttle butterfly and the port wall and adjust the idle throttle screw until the feeler just falls out. Then leave it exactly where it is.
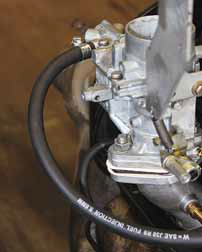 27 Fit the carbs to the inlet manifolds, then to the engine. We used new fuel hoses and 4mm ID rubber hose from the vacuum take-offs in the base of each carb.

28 The ends of these new rubber vacuum hoses were taken up to the top of the fan housing and fixed in that general area – you’ll see why in a minute. The last part of the static set up is to wind both idle mixture screws all the way in, then out by three full turns. This isn’t a critical amount, but it is important to make sure it’s the same on both carbs.
29 With the engine back in (if it was removed in the first place), disconnect one end of the throttle linkage and start the engine. Let the engine warm up and set the ignition timing. Then, on each carb, wind the idle mixture screw in until the engine starts to slow down, then wind it slowly back out until it starts to speed up again. Leave it there. Adjust the idle speed screws the same amount on each carb until the idle speed is right.
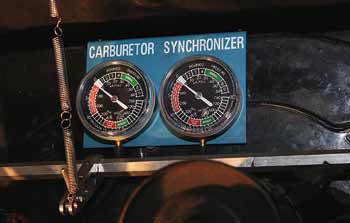
30 To set the throttle linkage up so the carbs are balanced – i.e. opening by the same amount at the same time – we used a carb synchroniser. This is basically two vacuum gauges, each connected to one carb, reading the vacuum on each side. The 4mm ID rubber hose from the vacuum take-off on each carb fits to the inlets on the gauges.
 31 Now gently rev the engine and see how the two gauges relate. As you can see, ours were out of balance, with the left carb showing less vacuum, meaning it is not as far open.

32 To cure this, we extended the length of the drop link from the horizontal cross bar on that side by loosening the jam nut and rotating the shaft.

33 That’s better. A few more revs and the gauges follow each other, indicating the carbs are balanced. Job done. The result of all this was perfect cold-starting, an even idle, clean pick up with no hesitation or fluffing and 27mpg on the run down to Brighton Breeze. Nice…