Updated with new information on 8 January 2024
Fitting new curtains, or replacing your old ones, is a great way to transform the interior of your campervan and make it an even comfier home away from home.
We've put together this quick guide on installing a new set of campervan curtains, to help you make the most of your next camping adventure.
There are a number of different tracks on the market that are loosely based around the well-known Silent Gliss system – an aluminium extrusion into which plastic sliders are fitted, and the curtain hooks then attach to these. There are different sets depending on what model of Bus you have, but the fitting process is the same across the board. For this guide, we used one of our VW T2 Bays and a set of curtain rails and runners from JK HQ.
Here's how to install a new set of curtains in your classic camper
Before fitting all of the curtain rails and sliders, run one single slider all the way round the fitted tracks to ensure there are no kinks and everything runs freely.
Your first job is to check that you have all of the track, sliders, hooks, screws and end stops that you'll need. We've put together a complete curtain fitting kit, so you can be sure you've got all the parts you need to get the job done in one go.
Next, you'll need to measure everything and cut the tracks to length. Although they're sent out to you already cut roughly to the correct size, it’s better to get them right before you start drilling holes!


Depending on your interior layout, you may need to remove some furniture to be able to fit the tracks all the way round.
It’s also worth checking at this point if the headliner is looking shabby around the window surrounds, as now might be a good time to replace this.
Once you’ve cut the tracks to length, and are happy with their location, it’s time to start drilling holes.
There will already be holes in the curtain track, so use these as a guide. We used the small screws provided in the kit, and found that a 3.2mm drill bit was just about right, but it's always worth checking this, as screws may vary.
Most of the screws can be put in place using a battery-powered drill with a screwdriver bit fitted. However, we usually find that in some places, where the metal is two skins thick, it’s better to use a hand screwdriver as it is very easy to round the small screw heads off.
The front cab sections are a little fiddly to do. You need to make sure the tracks run above the windscreen without interfering with the sun visors, clips and rear view mirror.


Carefully bend the tracks to an almost 90-degree bend with two twists – one so it sits flat with the metal above the door, and the other so it sits flat against the metal above the windscreen but below the sun visors.
Start securing into place in the same way as the other tracks one side at a time, then manipulate the track into place to finish up.
On the vehicle C-pillar, at the rear of the sliding door, we made a small bend so the track fits flush all the way along the side of the camper. We very carefully bent it by hand, but don’t be too enthusiastic as it’s very easy to put a kink in it, which will stop the sliders moving past it. Slow and steady is definitely the approach here!
Gently shape the track to fit around the sliding door runner, again ensuring you don’t kink the track.
You'll need to trim the screws down a bit for this section, as there isn’t much clearance behind the metal you are screwing into. If you don’t do this, you'll end up with a screw sticking out of the middle of your track. This particular kit comes with two sections for the cab that meet in the middle next to the rear view mirror.
And that's it! You're all done! Excellent work, we knew you could do it!
Shop campervan curtain parts at Just Kampers:
-
 JK Plastic Curtain Rail (C Profile) 2.25 x 5 Meter Lengths (Includes Clips, Glides & End Stops)
From £4.36 Regular Price £5.50
To £59.99 Regular Price £75.50


Looking to fit curtains to your modern VW camper?
We've also got a how-to video on fitting a new set of curtains to your Volkswagen Transporter, which we filmed while working on Project 22 - an entry level VW T6.1 which we transformed into a dream camper for under £10,000.
Check out our video, JK Guide - How to fit curtains to your van, below:

Don't Forget to Update Your Camper Insurance
If you're investing in a set of curtains for your camper, it's likely to increase the overall value of your vehicle, and so you'll want to make sure that this is reflected in your campervan's agreed valuation (assuming your insurer offers agreed value policies).
With this change made to your camper insurance policy, you can relax knowing that if the worst should happen, your new curtains (and everything else) will be taken into account if you need to make an insurance claim.
What is an Agreed Value policy?
Not all insurers will offer an agreed valuation policy, although Just Kampers Insurance does. This is definitely worth looking into if you've undergone a campervan conversion, restoration project, or substantial modifications to your camper, as it means that your insurance policy will properly reflect the true value of your vehicle, rather than simply the listed market value.
It's unlikely that curtains on their own will do too much to alter the value of your vehicle, but if you're fitting them as part of a larger camper conversion project, then it's definitely something to take into account.
The team at Just Kampers Insurance can help you understand more about agreed value policies, or get you a quote to see how much you could save on insuring your campervan. They've been working hard to find the best insurance policies at the best rates since 1998, so their friendly team of experts are the perfect people to speak to.
Old, stiff, bent and broken curtain tracks can not only look untidy, but can be a real pain come bedtime. Maybe you’ve just bought a Bus and it hasn’t got any as it started life as a Transporter. Or, maybe you would like to upgrade from the classic DIY wires or the flat aluminium rods Westfalia used.
There are a number of different tracks on the market that are loosely based around the well-known Silent Gliss system – an aluminium extrusion into which plastic sliders are fitted, and the curtain hooks then attach to these. There are different sets depending on what model of Bus you have, but the fitting process is the same across the board.
TOP TIP
Before fitting all of the curtains and sliders, run one single slider all the way round the fitted tracks to ensure there are no kinks and everything runs freely.

First job is to check you have all of the track, sliders, hooks, screws and end stops in the kit. Next job is to measure everything and cut the tracks to length. Although they come roughly to size, it’s better to get them right before you start drilling holes.
 Depending on your interior layout, you may need to remove some furniture to be able to fit the tracks all the way round. It’s also worth checking at this point if the headliner is looking shabby around the window surrounds as now might be a good time to replace this. This Bus was having a wooden ply ceiling fitted, and was painted around the window apertures.

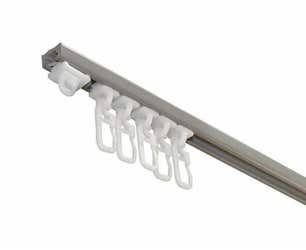
This picture shows how the rail system works. You can use a metal end stop as the last hook to stop the curtain pulling too far round. This kit has the better (flatter) style of curtain hooks to keep the curtains closer to the Bus and held prevent gaps.

Once you’ve cut the tracks to length, and are happy with their location, it’s time to start drilling holes. There will already be holes in the track so use these as a guide. We used the small screws provided in the kit and found 3.2mm drill bit was just about right, but check this as screws may vary.
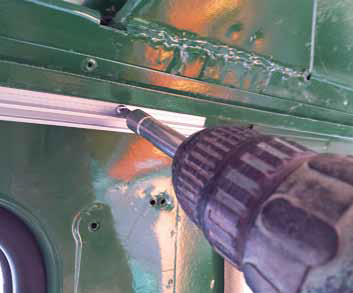
Most of the screws can be screwed into place using a battery drill with a screwdriver bit fitted, although I found in some places where the metal is two skins thick, it’s better to use a hand screwdriver as it is very easy to round the small screw heads off.

This particular Bus had a Westfalia-style wooden headliner, so we fitted the tracks slightly lower than the roof support panel.
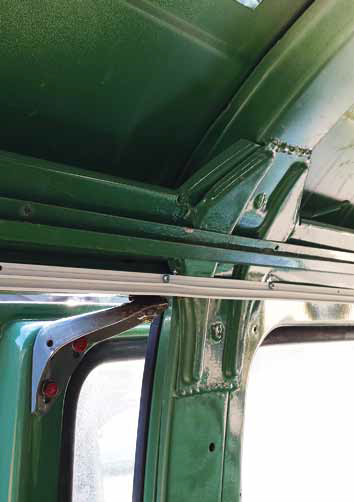 On the c-pillar at the rear of the sliding door we made a small bend so the track fits flush all the way along the side of the Bus. I very carefully bend it by hand, but don’t be too enthusiastic as it’s very easy to put a kink in it, which will stop the sliders moving past it.

Gently shape the track to fit around the sliding door runner, again ensuring you don’t kink the track. You will need to trim the screws down a bit for this section as there isn’t much clearance behind the metal you are screwing into. If you don’t do this, you will end up with a screw sticking out of the middle of your track.

The front cab sections are a little fiddly to do. You need to make sure the tracks run across above the windscreen without interfering with the sun visors, clips and rear view mirror.

Carefully bend the tracks to an almost 90-degree bend with two twists – one so it sits flat with the metal above the door and the other so it sits flat against the metal above the windscreen but below the sun visors.
 Start securing into place in the same way as the other tracks one side at a time, then manipulate the track into place to finish up.
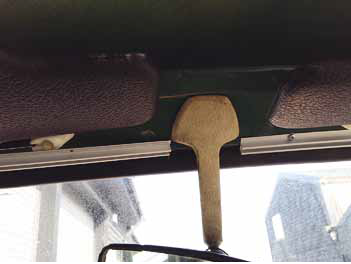 This particular kit comes with two sections for the cab that meet in the middle next to the rear view mirror.

Depending on the furniture, you can either fit the rear track to the top of the rear door or to the underneath of the roof locker. If fitting to woodwork, you may need to find more appropriate screws as the ones provided are intended for metal.