Written by Mark Walker, originally published in VolksWorld magazine
Bay Window sliding doors suffer badly with rot. The vast majority of RHD Buses will either have had, or will need some repair work in this area, usually due to blocked drain holes, damage or just the fact that all
these Buses are now nearing half a century old. If you tackle the job and it hasn’t been repaired before, then your luck is in!
The fact that it is a tricky area to repair well means it comes in for a lot of bodging, with filler, newspaper, seam sealer and even expanding foam, along with the old patch welded over a rusty door bottom trick, commonplace. Your Bus deserves better. Here we will show you how to remove all the grot and replace the whole lot with a new, genuine VW panel. Of course, you could try and source a rust-free replacement door, but these don’t come cheap, so why not follow these steps and repair the door you have the right way?
 Image Credit: Mark Walker
01 Preparation
To do this job properly, you need to remove the door first and support on a pair of sturdy stands in order to be comfortable while carrying out the repair. To prevent any unnecessary damage, it is wise to remove the glass, trim and interior panel before commencing work. Alternatively, wrap them in several layers of cardboard and masking tape. We also elected to remove the wooltype insulation from the inside of the door with a sharp blade as we didn’t want a fire on our hands.
 Image Credit: Mark Walker
02 Mark out and cut off outer skin
We used repair panels from Just Kampers (www.justkampers.com / tel. 0800 018 3211). The inner panel is made by Klokkerholm and is the only inner panel currently available. It needs some work to fit correctly, especially in the corners, but is not too bad as repair panels go. The outer skin repair panel is exclusive to JK’s Preservation Parts range and, unlike some of the cheaper panels available, has the correct curved profile.
Offer up the outer repair panel first and scribe a line into the paint along its upper edge. We had to guess where the panel should be as the bottom of our door was so bad, but it’s not critical at this stage. You are aiming to cut a ‘window’ in the outer skin, but leave plenty of metal on the door so you can do final trimming later on.
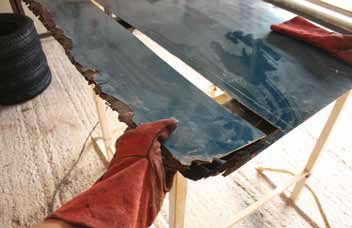 Image Credit: Mark Walker
03 Cutting time
When you have marked the upper reach of the repair panel, take a 1mm cutting disc on the angle grinder, don your safety goggles and thick gloves and cut a line across the door skin about an inch below the scribed line. Don’t go too deep, or you will cut into the inner structure of the door. With this done, cut a vertical line each side of the door about half an inch in from the edge of the door. Our door was so rusty that this was enough to remove the lower outer skin but, if your door is not this bad, you may need to cut along the bottom too. Again, around half an inch in from the edge should do it.
 Image Credit: Mark Walker
04 Clean up
With a wire wheel attachment on your grinder, clean off the paint on the lower edge flanges you left in place in the previous step, then go on to clean off all the rusty areas back to bare metal. As you can see in the pictures, these ‘spider tracks’ are the start of rust creeping under the base coat, so clean off the paint beyond these areas, before going over them with the wire wheel to eradicate them.
This process will also clean back the metal to show you how much you need to cut off. I try and leave as much original metal as possible, as at some point many years from now, the door may need repairing again. If you use the whole repair panel now, the next time you repair it, you will have to cut beyond the area a repair panel will cover. That said, if you have any heavy pitting, you really need to replace the metal in these areas. I also took this opportunity to clean up the back edges of the door where the skin is folded over, as this is another common area for rust to start creeping in.
 Image Credit: Mark Walker
05 Remove flange, carry out extra repairs
Image Credit: Mark Walker
05 Remove flange, carry out extra repairs
Re-attach the 1mm cutting disc to the grinder and make a very shallow cut around the edge flange as shown above to remove the remaining metal.
Once this is done, change to an 80-grit flap disc. What you are aiming to do is grind through only the remaining pieces of outer skin to remove them, but not grind through the inner skin.
To do this, go slowly and carefully, until you see the metal turn blue, then you can tap the remains off with a chisel, or continue very carefully grinding it until it falls off.
With the lower outer skin sections removed, you can offer up the inner skin repair panel to see if it is large enough to cover the rusted area.
Our door needed an extra repair to one edge of the inner skin, so we made a card template, transferred it onto a piece of steel and butt welded it on to the door, before grinding it smooth ready for the inner panel repair.
 Image Credit: Mark Walker
 Image Credit: Mark Walker
06 Prepare panel for welding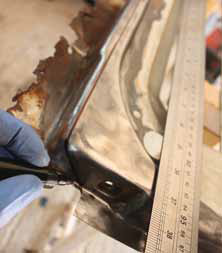 Image Credit: Mark WalkerWe elected to cut through the lower frame in the area indicated, as it was deemed the easiest place to butt weld and make a join as invisible as possible. To mark out, take a metre rule and draw a line with
a Sharpie, or a pencil, along the centre of this section. You will need to offer up the repair panel and decide how you want to tackle the corners.
Once you have marked out the area, use the grinder with a 1mm cutting disc to cut along your lines. Be careful in the area where the inner support is for the lower roller – make a shallow cut in this area to avoid
damaging this bracket – or you will need to repair it before proceeding.
 Image Credit: Mark Walker
07 Remove bracket
With the lower panel cut all the way around, you will need to remove it from the lower roller support bracket. The skin is held to the bracket with two spot welds. Ideally, you should use a spot weld drill bit here. As you have cleaned up the area back to bare metal, you should see the spot weld dimples. If not, feel for them with your fingers. Go slowly with the drill and you should be able to remove the rusted panel without any peripheral damage. Before we did this step, we made a card template to transfer the holes for the lower roller bracket onto the new panel. There are dimples in the Klokkerholm panel, but we wanted to be sure of the correct position.
 Image Credit: Mark Walker
08 Trim new inner panel, prepare for welding
We removed the rusted inner section in two pieces – the main section and the area around the lower roller bracket. Having done it this way, we could fit the rusted pieces over the new repair panel and scribe
along the cut surface to get a datum for how much to remove from the new repair panel. Having done this, you can remove the extra metal.
Again, you need to leave some metal below the scribed line, and remove the metal in stages, remembering it is a lot easier to remove more metal than weld metal back on. Take your time here in the fitting stages, as it will not only make the welding portion easier, but will result in a nicer
and more visually pleasing repair, too.
When you have the panel fitting nicely along the cut line, prepare to weld it in place. Make sure you remove paint from all the areas to be welded, otherwise your welds will be messy. The corners are a little
more troublesome, so we chose to get the panel fitting nicely along the edge and tackle the corners once the panel was tacked in position. With everything cleaned up for paint, take a file and remove the swarf along the edges that was created by using the cutting disc. This will make for a cleaner weld and make it easier to grind the welds back later on.
 Image Credit: Mark Walker
09 Weld on inner repair panel
So, everything is clean and shiny, the panel fits well and is ready to weld? Okay, you can now tack the panel in place. Initially, just put a tack at each end, then work around the panel tacking every 2-3 inches. You can use clamps here, but we chose to hold the panel in place by hand and eyeball the panel to make sure it’s flush. If you make a mistake and tack it in the wrong position, or skewed, stop and slit through the weld with a cutting disc and re-position, rather than continuing and making a mess.
Once the main panel is tacked in place, you can work around the corners. This is a matter of lining up the pieces, tack, line up the next bit, tack, and so on. We needed to use a hammer and dolly and some grips
to re-shape the panel at the corners and manipulate it to fit correctly.
Once you are happy with the fit of the panel, it is a simple case of joining the dots. A word of caution here though – take your time. Put one or two tacks in one place, then move to the opposite end, then the
centre, then rest for a minute. Go too fast and you’ll warp the panel. It should take a couple of hours until the panel is welded along its full length. Remember, you can do a fast job, or a good job, your choice.
 Image Credit: Mark Walker10 Grind, paint and re-fit door
With the inner repair completely welded and allowed to cool down, grind back the welds. We used an 80-grit flap disc on the angle grinder for this. Remember, it is just as easy to warp a panel with the grinder as the welder, so take your time and move around the panel a lot, before stopping regularly to allow cooling. With the welds ground down satisfactorily, you can coat the inner surfaces that will be hidden by the skin with a good anti-rust paint. On this occasion, we chose Bonda primer, as it works and isn’t porous like other primers. Wipe over the surface with a degreaser such as thinners first, then aim for two coats of paint, to avoid rusting where any bristle marks are. In the 30+ degree heat we were working in, the paint was dry in about 10 minutes, meaning the door could be handled again quickly. Now you need to re-fit the door to the Bus so the correct position and curvature of the outer skin can be achieved.
 Image Credit: Mark Walker
 Image Credit: Mark Walker
11 Offer up outer panel, scribe and trim the door
With the door in position and closed, offer up the inner panel and find a position where it fits with an even gap all round. You can check the curvature of the lower inner panel is correct here too, and manipulate it until it all fits well. Once you have found where it sits best, scribe a final cut line onto the door. It is best to remove the door to trim it and fit the panel, then trial fit again once everything is tacked in position. Sure, you could be lazy at this point, but why risk ballsing it all up for the sake of 20 minutes extra work?

12 Trim door, fit and tack outer skin
With the door removed again and supported on stands, carefully trim along the cut line. If you are mister shakey hand man, remove less metal and then use a flap disc to do final trimming. With everything trimmed, remove all the paint in the areas to be welded. We chose to punch holes in the flanges to enable them to be plug welded in position once they are folded over. If you don’t have a punch tool, you can drill a series of holes with a 4mm drill bit. The skin can then be fitted in position and tacked along the cut line. Once tacked, fold around the flanges with the hammer and dolly. Before you plug weld it in place, you should fit the door again to check it all looks hunky dory.
 Image Credit: Mark Walker
13 Weld door skin
So, you’ve test fitted the door for the final time, made any little tweaks you deemed necessary and now you have the door on the stands in front of you ready for final welding. Plug weld the flanges to the inner panel and slowly join the dots to weld the skin on. If you thought you needed to go slow with the inner panel, this panel is much worse. As it is such a large flat panel, it is very prone to warping, so needs to be welded very slowly and carefully, with lots of down time to allow it to cool.
Some people like to joggle an edge on this panel and lap weld it, but we prefer to make a nice butt- welded join and be able to sleep peacefully in the knowledge we have not fitted a panel with an in-built moisture trap.
 Image Credit: Mark Walker
14 Grind and finish
Take a new 40-grit flap disc and carefully use the edge to grind down the plug welds along the inner flange. Again, move around constantly and grind each area in stages to avoid warpage. Take your
time, and alternate grinding the plug weld area and the outer skin. Stop regularly for cool down time. Patience, Penfold.
Once all the welds are ground down, you are done. If all has gone to plan, a light skim of filler along the join is all you should need before prepping for paint. Good work.