
Petrol Tank Filler Neck Rubber VW T2 Bay 1973–1979
Exclusive to Just Kampers, VW T2 Bay Window rubber petrol tank filler neck. Suitable for VW T2 Bays from 1973 to 1979.
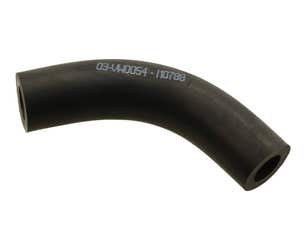
This petrol tank filler neck made exclusively for JK and is the part you need to replace your split or cracked original. Please note that this part does not fit T2 pick-ups.
Exclusive to Just Kampers, VW T2 Bay Window rubber petrol tank filler neck. Suitable for VW T2 Bays from 1973 to 1979.
Country of Manufacture | Taiwan |
---|---|
EAN/UPC | 5060661044770 |
Width (CM - Packed) | 9 |
Height (CM - Packed) | 9 |
Depth (CM - Packed) | 12 |
Manufacturer | Just Kampers |
OEM Part Number | 211201119 |
-
VW T2 Bay Window (1973 - 1979) Air-Cooled Petrol 1600cc, 1700cc, 1800cc, 2000cc LHD, RHD
-
Good quality, not excellent like the original partGood quality, not excellent. Difficult to install (remove fire wall), you need to line the new filler neck rubber excatly like the old one otherwise the filler tube won't line up with the opening of the fuel tank.
Posted on
-
Good QualityEasy to fit as we had the wheel-arch cut off for replacement..Seems like good quality. For the small outlay it is a good idea to change the fuel filler pipes when you are fitting a new wheel arch.
Posted on
-
Excellent quality and easy to fitThe part appears to be of excellent quality. It might be better if it was supplied with a new hose clamp as I can’t see it being a good idea to go to all the trouble without one. At my time of purchase they had lots in stock the only downer for me was they weren’t open on the previous Saturday when I diagnosed the source of my petrol smell.
The general consensus is that you need to drop the engine and tank out to fit this part. In my case (T2 ’74 Bay) there is a pop out panel (bit like the lid of a metal paint can) in the engine bay which gives access to the lower end of the fuel filler neck metal tube. Using this access I detached the metal filler neck and pulled the assembly complete with the old filler neck rubber attached. Fitting the new part was easy just make sure you fit it at the correct angle with a new hose clamp. The assembly can now be fed back through the access port and by gently teasing the new filler neck flange through the exterior hole in the wing everything is in place for reassembly which everyone knows is the reverse of disassembly with the exception of a slightly different choice of expletives.
There you go, fitted without dropping the engine & tank and all done in less than two hours. Hope this saves someone the time and effort.
It’s only the lack of hose clamp and being open on Saturday that prevented me from giving it a 5 star rating.
Posted on
Seen This Product Cheaper Elsewhere?
If you have seen the same product cheaper elsewhere then please let us know.